
Thursday, November 29, 2012
Wednesday, November 28, 2012
Android & Arduino: LEDS control
Hi all,
last week I have bought an OTG cable so I can interface my Android devices (Galaxy Nexus, Xoom) with the Arduino board.
My example is to turn on and off the LEDs located on Arduino by an Android device!
What we need:

This code is really easy to understand: if you get the string "1" turns ON the LED on pin 2, if you get the string "2" turns ON the LED on pin 3 ... and so on. If you get the string "A" turns OFF the LED on pin 2, if you get the string "B" turns OFF the LED on pin 3... and so on.
And this is the code for the Android app:
Here there's the WOW effect! Because thanks to the IPC Android system I can communicate with Arduino through the use of broadcast intent, because the part of interfacing with the ADK was handled by Arduino Uno Communicator. To send data to Arduino from your application it's only necessary broadcasting an intent with action "primavera.arduino.intent.action.SEND_DATA". Add the data to be sent as byte array extra "primavera.arduino.intent.extra.DATA".

And this is the video of the demo:
last week I have bought an OTG cable so I can interface my Android devices (Galaxy Nexus, Xoom) with the Arduino board.
My example is to turn on and off the LEDs located on Arduino by an Android device!
What we need:
- Arduino Uno board
- Android devices (version 3.0 or higher)
- Micro USB OTG to USB Adapter (thanks to Amazon!)
- Arduino Uno Communicator (avaiable on playstore)
- 3x leds
- 3x resistors
- 4x cable connection strips
- Breadboard
So make the connection as shown in the picture:

Now we have to load this code in Arduino:
/*
 * Arduino LEDs Control
 *
 */

int val = 0;       // variable to store the data from the serial port
int ledPin1 = 2;   // LED connected to digital pin 2
int ledPin2 = 3;   // LED connected to digital pin 3
int ledPin3 = 4;   // LED connected to digital pin 4
int ledPin4 = 5;   // LED connected to digital pin 5
int ledPin5 = 6;   // LED connected to digital pin 6

void setup() {

  pinMode(ledPin1,OUTPUT);    // declare the LED's pin as output
  pinMode(ledPin2,OUTPUT);    // declare the LED's pin as output
  pinMode(ledPin3,OUTPUT);    // declare the LED's pin as output
  pinMode(ledPin4,OUTPUT);    // declare the LED's pin as output
  pinMode(ledPin5,OUTPUT);    // declare the LED's pin as output


  Serial.begin(9600);        // connect to the serial port
}

void loop () {
  val = Serial.read();      // read the serial port


  if (val !=-1){

    if (val=='1'){
      digitalWrite(ledPin1,HIGH);
    }

    else if (val=='A'){
      digitalWrite(ledPin1,LOW);
      }

    if (val=='2'){
      digitalWrite(ledPin2,HIGH);
    }

    else if (val=='B'){
      digitalWrite(ledPin2,LOW);
      }

    if (val=='3'){
      digitalWrite(ledPin3,HIGH);
    }

    else if (val=='C'){
      digitalWrite(ledPin3,LOW);
      }

    if (val=='4'){
      digitalWrite(ledPin4,HIGH);
    }

    else if (val=='D'){
      digitalWrite(ledPin4,LOW);
      }

    if (val=='5'){
      digitalWrite(ledPin5,HIGH);
    }

    else if (val=='E'){
      digitalWrite(ledPin5,LOW);
      }

    //Serial.println();
  }
}
This code is really easy to understand: if you get the string "1" turns ON the LED on pin 2, if you get the string "2" turns ON the LED on pin 3 ... and so on. If you get the string "A" turns OFF the LED on pin 2, if you get the string "B" turns OFF the LED on pin 3... and so on.
And this is the code for the Android app:
package com.spinettaro.arduinoledscontrol;

import android.app.Activity;
import android.content.Intent;
import android.os.Bundle;
import android.view.Menu;
import android.view.View;
import android.widget.CompoundButton;
import android.widget.CompoundButton.OnCheckedChangeListener;
import android.widget.Switch;
import android.widget.Toast;

public class MainActivity extends Activity implements OnCheckedChangeListener {

 // set in an array the id of every switch
 private final static Integer[] ids = { R.id.switch1, R.id.switch2,
   R.id.switch3, R.id.switch4, R.id.switch5 };

 @Override
 protected void onCreate(Bundle savedInstanceState) {
  super.onCreate(savedInstanceState);
  setContentView(R.layout.activity_main);
  registerLedChangeListener(ids);
 }

 //register all onCheckedChangeListener for all Switch
 private void registerLedChangeListener(Integer... ids) {
  for (int i = 0; i < ids.length; i++) {
   Integer id = ids[i];
   Switch led = (Switch) findViewById(id);
   led.setOnCheckedChangeListener(this);
  }
 }

 public void loop(View v) {
  try {
   // gone
   sendString("1");
   Thread.sleep(50);
   sendString("A");
   Thread.sleep(50);
   sendString("2");
   Thread.sleep(50);
   sendString("B");
   Thread.sleep(50);
   sendString("3");
   Thread.sleep(50);
   sendString("C");
   Thread.sleep(50);

   // return
   sendString("3");
   Thread.sleep(50);
   sendString("C");
   Thread.sleep(50);
   sendString("2");
   Thread.sleep(50);
   sendString("B");
   Thread.sleep(50);
   sendString("1");
   Thread.sleep(50);
   sendString("A");
   Thread.sleep(50);
  } catch (Exception e) {
   Toast.makeText(this, e.getMessage(), Toast.LENGTH_SHORT).show();
  }
 }

 @Override
 public boolean onCreateOptionsMenu(Menu menu) {
  // Inflate the menu; this adds items to the action bar if it is present.
  getMenuInflater().inflate(R.menu.activity_main, menu);
  return true;
 }

 @Override
 public void onCheckedChanged(CompoundButton buttonView, boolean isChecked) {
  switch (buttonView.getId()) {
  case R.id.switch1:
   if (isChecked)
    sendString("1");
   else
    sendString("A");
   return;
  case R.id.switch2:
   if (isChecked)
    sendString("2");
   else
    sendString("B");
   break;
  case R.id.switch3:
   if (isChecked)
    sendString("3");
   else
    sendString("C");
   break;
  default:
   break;
  }
 }

 private void sendString(String toSend) {
  Intent i = new Intent("primavera.arduino.intent.action.SEND_DATA");
  i.putExtra("primavera.arduino.intent.extra.DATA", toSend.getBytes());
  sendBroadcast(i);
 }

}
Here there's the WOW effect! Because thanks to the IPC Android system I can communicate with Arduino through the use of broadcast intent, because the part of interfacing with the ADK was handled by Arduino Uno Communicator. To send data to Arduino from your application it's only necessary broadcasting an intent with action "primavera.arduino.intent.action.SEND_DATA". Add the data to be sent as byte array extra "primavera.arduino.intent.extra.DATA".

And this is the video of the demo:
Here you can find the full source code for Android application.
Tuesday, October 30, 2012
DroidDevCon - An Android Conference - EN
Hi all,
As you learned from my previous post the day 10/24/2012 took place in Verona, Italy, the first Italian conference on Android development: DroidDevCon.

So I'm here to write my thoughts :) .
The conference was very successful, both in terms of organization and content.
There have been interesting talks as "Android for embedded devices" that talked about the customization of Android on dedicated devices (which unfortunately I could not attend). I look forward to the availability of the video to cover it with care; yes, because all sessions were shooting!
So if anyone is interested to conference or video I think will soon be available at these locations DroidDevCon - bit Time TV.
I could not attend some sessions because I was busy with my presentations: "Developing games with AndEngine" & "In-app billing."
The first regards to how develop games with AndEngine: a game-engine for Android, the second how works how you can implement the in-app billing service provided by Google Play.
I wanted to take this opportunity to show a slide (introduced in the second presentation) very successful, friendly and gave me a great satisfaction in demonstrating:

This image has been used to explain the differences between freemium-model and payment-model and what is the right way to choose without falling into the "trap."
To all those who don't know what it means I place also the video of the famous saga:
I conclude by thanking all for the beautiful experience! It was a day where I could compare with other developers, learn new things and explore the familiar concepts! But above all it was a day on which I have drawn ideas and inspiration! So in the next few days you will see other posts :).
I hope DroidDevCon be repeated again next year, because it was a conference with the WOW effect!
I hope DroidDevCon be repeated again next year, because it was a conference with the WOW effect!
Sunday, October 28, 2012
DroidDevCon - An Android Conference - ITA
Hi all,
come avete appreso da un mio post precedente il giorno 24/10/2012 si è svolta a Verona la prima conferenza italiana sullo sviluppo Android: DroidDevCon.

Quindi sono qui per scrivere le mie riflessioni :) .
La conferenza è stata veramente ben riuscita, sia dal punto di vista dell'organizzazione che dal punto di vista dei contenuti.
Ci sono stati talk interessantissimi come "Android per dispositivi embedded" che parlava della customizzazione di Android su dispositivi dedicati (al quale purtroppo non ho potuto assistere). Non vedo l'ora che siano disponibili i video per riguardarlo con attenzione; già perché tutte le sessioni sono state riprese! Quindi se qualcuno è interessato alla conferenza o ai video penso che tra poco saranno disponibili a questi indirizzi DroidDevCon - bit Time TV. Non ho potuto assistere ad alcune sessioni perché ero impegnato con le mie presentazioni: "Sviluppare videogiochi con AndEngine" & "In-app billing". Il primo riguarda come sviluppare giochi con AndEngine: un game-engine per Android; il secondo di come funziona e come si implementa il servizio di in-app billing messo a disposizione del Google Play.
Volevo cogliere l'occasione anche per mostrarvi una slide introdotta nella seconda presentazione molto riuscita, simpatica e che mi ha dato una bella soddisfazione nel mostrarla:

è stata utilizzata per spiegare le differenze tra modello free e modello a pagamento e quale è la strada giusta da scegliere senza cadere nella "trappola".
A tutti coloro che non sanno cosa significa posto anche il video della famosissima saga:
Volevo concludere ringraziando tutti per la bella esperienza passata! è stata una giornata intensa dove mi sono potuto confrontare con altri sviluppatori, imparare cose nuove ed approfondire i concetti già acquisiti! Ma soprattutto è stata una giornata dalla quale ho ricavato idee e spunti! Quindi nei prossimi giorni vedrete altri post :). Spero che DroidDevCon si ripeta anche il prossimo anno, perché è stata una conferenza con l'effetto WOW!
come avete appreso da un mio post precedente il giorno 24/10/2012 si è svolta a Verona la prima conferenza italiana sullo sviluppo Android: DroidDevCon.
Quindi sono qui per scrivere le mie riflessioni :) .
La conferenza è stata veramente ben riuscita, sia dal punto di vista dell'organizzazione che dal punto di vista dei contenuti.
Ci sono stati talk interessantissimi come "Android per dispositivi embedded" che parlava della customizzazione di Android su dispositivi dedicati (al quale purtroppo non ho potuto assistere). Non vedo l'ora che siano disponibili i video per riguardarlo con attenzione; già perché tutte le sessioni sono state riprese! Quindi se qualcuno è interessato alla conferenza o ai video penso che tra poco saranno disponibili a questi indirizzi DroidDevCon - bit Time TV. Non ho potuto assistere ad alcune sessioni perché ero impegnato con le mie presentazioni: "Sviluppare videogiochi con AndEngine" & "In-app billing". Il primo riguarda come sviluppare giochi con AndEngine: un game-engine per Android; il secondo di come funziona e come si implementa il servizio di in-app billing messo a disposizione del Google Play.
Volevo cogliere l'occasione anche per mostrarvi una slide introdotta nella seconda presentazione molto riuscita, simpatica e che mi ha dato una bella soddisfazione nel mostrarla:

è stata utilizzata per spiegare le differenze tra modello free e modello a pagamento e quale è la strada giusta da scegliere senza cadere nella "trappola".
A tutti coloro che non sanno cosa significa posto anche il video della famosissima saga:
Volevo concludere ringraziando tutti per la bella esperienza passata! è stata una giornata intensa dove mi sono potuto confrontare con altri sviluppatori, imparare cose nuove ed approfondire i concetti già acquisiti! Ma soprattutto è stata una giornata dalla quale ho ricavato idee e spunti! Quindi nei prossimi giorni vedrete altri post :). Spero che DroidDevCon si ripeta anche il prossimo anno, perché è stata una conferenza con l'effetto WOW!
Wednesday, October 10, 2012
DroidDevCon - An Android conference
DROIDDevCon is the first conference in italy completly focused on Android OS development.

This conference is an important event for all developers or software Engineers who want beeing updated on Mobile Development and getting new knowledge on Android development.
The conference web site is http://www.droiddevcon.it.
I think it will be a really interesting event! Do not miss!!
The conference web site is http://www.droiddevcon.it.
I think it will be a really interesting event! Do not miss!!
Thursday, May 10, 2012
AndroidDev: How to start a specific Activity
Hi developer!
In this article I will show you how to start a specific Activity by specific name or package.
For this, I used Explicit Intent and Extras.
An Explicit Intent is an intent that specify the class to load.
By the PackageManager I have retrieved Intent for a specific package:
Then I put some extras within:
A specific use of this app is to create an Intent within particular Extras to pass to your activity for determinate specific feature in yuor application.
For example if you want to run your app with "debug features" you can pass a boolean into the Extras so in your app you can manage this choice.
Another specific use is to create an application that can launch other app or "app launcher".
Amazing!!
In this article I will show you how to start a specific Activity by specific name or package.
For this, I used Explicit Intent and Extras.
An Explicit Intent is an intent that specify the class to load.
By the PackageManager I have retrieved Intent for a specific package:
Intent LaunchIntent = getPackageManager().getLaunchIntentForPackage("com.package.address");
Then I put some extras within:
LaunchIntent.putExtra("isdebug", true);
startActivity(LaunchIntent);
A specific use of this app is to create an Intent within particular Extras to pass to your activity for determinate specific feature in yuor application.
For example if you want to run your app with "debug features" you can pass a boolean into the Extras so in your app you can manage this choice.
Another specific use is to create an application that can launch other app or "app launcher".
Amazing!!
Tuesday, April 17, 2012
Intercept SMS with Broadcast Receiver
Hi developers,
in Android Broadcast Receivers are used to listen for broadcast Intents. A Broadcast Receiver needs to be registered, either in code or within the application manifest. (in this case is registered in the manifest)
When registering a Broadcast Receiver you must use an Intent Filter to specify which Intents it is listening for.
We use BroadcastReceiver to intercept SMS.
See the code below
As you can see, we extends from BroadcastReceiver and override the method onReceive where we retrieve information about the received SMS.
In the manifest you must define the RECEIVE_SMS uses-permission, register the receiver (our class SMSBroadcastListener) and his intent-filter (SMS_RECEIVED):
They will be started automatically when a matching Intent is broadcast, in practice when received an SMS you will see a Toast with SMS information.
in Android Broadcast Receivers are used to listen for broadcast Intents. A Broadcast Receiver needs to be registered, either in code or within the application manifest. (in this case is registered in the manifest)
When registering a Broadcast Receiver you must use an Intent Filter to specify which Intents it is listening for.
We use BroadcastReceiver to intercept SMS.
See the code below
import android.content.BroadcastReceiver;
import android.content.Context;
import android.content.Intent;
import android.os.Bundle;
import android.telephony.SmsMessage;
import android.widget.Toast;

public class SMSBroadcastReceiver extends BroadcastReceiver{
        @Override
 public void onReceive(Context context, Intent intent) {
  Bundle bundle = intent.getExtras();
  SmsMessage[] msgs = null;
  StringBuilder str = new StringBuilder();
  if (bundle != null) {
   // --- retrieve the received SMS here ---
   Object[] pdus = (Object[]) bundle.get("pdus");
   msgs = new SmsMessage[pdus.length];
   for (int i = 0; i < msgs.length; i++) {
    msgs[i] = SmsMessage.createFromPdu((byte[]) pdus[i]);
    str.append("SMS from " + msgs[i].getOriginatingAddress());
    str.append(" :");
    str.append(msgs[i].getMessageBody().toString());
    str.append("\n");
   }
   // ...we show sms here...
   Toast.makeText(context, str.toString(), Toast.LENGTH_SHORT).show();
  }
 }
}
As you can see, we extends from BroadcastReceiver and override the method onReceive where we retrieve information about the received SMS.
In the manifest you must define the RECEIVE_SMS uses-permission, register the receiver (our class SMSBroadcastListener) and his intent-filter (SMS_RECEIVED):
They will be started automatically when a matching Intent is broadcast, in practice when received an SMS you will see a Toast with SMS information.
Thursday, April 5, 2012
AndroidDev: Getting started with Android development
AndroidDev: Getting started with Android development: Welcome developers! This guide will get you started with Android development. It explain how to configure the environment step by step. ...
Tuesday, April 3, 2012
Where am I? Finding your location
One of the coolest thing that you can do with your Android device, is find your location!
In Android there are location-based services to get the current location of device. There are two ways to get the physical location:
In Android there are location-based services to get the current location of device. There are two ways to get the physical location:
- Network Provider
- GPS Provider
By LocationManager object we can retrieve latitude and longitude of last known location.
Now with these information and using Geocoder we get the addresses in the neighbours. Here's the code snippet:
// max of adresses near you
int max_result = 1;
// you can decide if use a network or gps provider
String provider = LocationManager.NETWORK_PROVIDER;
LocationManager locationManager = (LocationManager) getSystemService(Context.LOCATION_SERVICE);
// get the last know location
Location location = locationManager.getLastKnownLocation(provider);
double latitude = location.getLatitude();
double longitude = location.getLongitude();
List<address> addresses = null;
Geocoder gc = new Geocoder(this, Locale.getDefault());
try {
     addresses = gc.getFromLocation(latitude, longitude, max_result);
} catch (IOException e) {}
// return the string information
Toast.makeText(this, addresses.get(0).toString(), Toast.LENGTH_LONG)
     .show();
This example assumes:- that you have enabled the NETWORK_PROVIDER
- so you can add in the manifest file the ACCESS_FINE_LOCATION uses-permission
Wednesday, March 21, 2012
Resources based on localization
Hi all!,
Today I will show you a very powerful technique, which we can exploit through localization: resources based on localization.
With the location and the opportunity given by Android to create specific resources based on the localization this powerful technique is very easy to implement.
The example that I will show is to select a language, and display a text according to your choice.
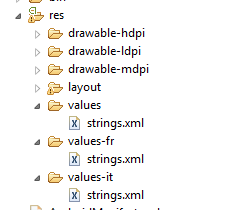
First create many localized folders as many languages we want to support , that is how many languages we want to display our text.
In the example, are 3 languages: English (default), Italian and French.
The Activity has consisted of only one spinner, which allows the choice of language, and a button to start the Activity containing our text:
We can observe what happens when we click an element in spinner: depending on the item clickedc we understand wich Locale we must create, so then, we invoke the method updateConfiguration to update the resource configuration! WOW!
That is going to change all the values of resources based on location.
The layout of the Activity that shows the text contains only a TextView that refers to our resource of type String, then by the choice of language made we can see the different texts.
Here's a short video:
This is the link of source code
Today I will show you a very powerful technique, which we can exploit through localization: resources based on localization.
With the location and the opportunity given by Android to create specific resources based on the localization this powerful technique is very easy to implement.
The example that I will show is to select a language, and display a text according to your choice.
First create many localized folders as many languages we want to support , that is how many languages we want to display our text.
In the example, are 3 languages: English (default), Italian and French.

Now we must create a resource file for each localized folder, where we will insert the text as a string resource.
Created our texts, we are going to implement graphically our selection language Activity:
The Activity has consisted of only one spinner, which allows the choice of language, and a button to start the Activity containing our text:
public class LocalizationUpdaterActivity extends Activity {

 /** Called when the activity is first created. */
 @Override
 public void onCreate(Bundle savedInstanceState) {
  super.onCreate(savedInstanceState);
  setContentView(R.layout.main);

  Spinner spinner = (Spinner) findViewById(R.id.spinner1);
  spinner.setPrompt("select language");

  ArrayAdapter adapter = new ArrayAdapter(this,
    android.R.layout.simple_spinner_item, languages);
  adapter.setDropDownViewResource(android.R.layout.simple_spinner_dropdown_item);
  spinner.setAdapter(adapter);

  spinner.setOnItemSelectedListener(new OnItemSelectedListener() {

   public void onItemSelected(AdapterView arg0, View arg1,
     int arg2, long arg3) {
    Configuration config = new Configuration();
    switch (arg2) {
    case 0:
     config.locale = Locale.ENGLISH;
     break;
    case 1:
     config.locale = Locale.ITALIAN;
     break;
    case 2:
     config.locale = Locale.FRENCH;
     break;
    default:
     config.locale = Locale.ENGLISH;
     break;
    }
    getResources().updateConfiguration(config, null);
   }

   public void onNothingSelected(AdapterView arg0) {
    // TODO Auto-generated method stub

   }
  });

 }

 public void onClick(View v){
  startActivity(new Intent(getBaseContext(), TextActivity.class));
 }
 private String[] languages = { "Inglese", "Italiano", "Francese" };
}
We can observe what happens when we click an element in spinner: depending on the item clickedc we understand wich Locale we must create, so then, we invoke the method updateConfiguration to update the resource configuration! WOW!
That is going to change all the values of resources based on location.
The layout of the Activity that shows the text contains only a TextView that refers to our resource of type String, then by the choice of language made we can see the different texts.
Here's a short video:
This is the link of source code
Subscribe to:
Posts
(
Atom
)