Showing posts with label Android. Show all posts

Friday, March 24, 2017

One codebase to rule them all - RAD Studio 10.2 Tokyo is here!

Finally, it's arrived!! The penguin invasion has started! RAD Studio 10.2 Tokyo is here bringing with it support for Linux!
Delphi for Linux is now available delivering support for Linux 64bit server-side and standalone applications for Ubuntu and RedHat Enterprise. Guys, I'm very enthusiastic about this new support! This is a very greats news for Delphi developers and not, everywhere!


By now Delphi can support and generate native code for several platforms (7 to be exact!!!): Linux (64bit), Windows (x86 and x64), OS X (32-bit ), iOS (32 and 64-bit) and Android.
I think that no citation may be more appropriate of this:
one codebase to rule them all
Below a list of the most interesting features available in this release (IMHO):

Delphi Linux Compiler


  • 64-bit Linux platform support
  • Delphi language support
  • ARC-enabled
  • 1-based strings
  • LLVM engine based

Supported Linux Distributions


  • Ubuntu Server (Ubuntu 16.04 LTS)
  • RedHat Enterprise Linux (version 7)

RTL features supported


  • Linux file system access
  • Threading and Parallel Programming Libraries support
  • Memory management
  • HTTP and REST libraries support for HTTP calls

64-bit Linux for Server Applications


  • FireDAC provides Linux support for all Linux-capable DBMS, with the only exception of Informix. See Database Connectivity.
  • WebBroker, RAD Server (EMS), and DataSnap support for Multi-tier servers (standalone and Apache modules).
  • DUnitX support.
  • PAServer support.
  • Indy-based client and server support.

FireMonkey


  • New System Status Bar Options on iOS
    • Two new properties have been added to TForm for changing the behavior of the system status bar on iOS: SystemStatusBar.BackgroundColor and SystemStatusBar.Visibility.


  • Multi-Threading Support for TBitmap, TCanvas and TContext3D
  • Unification of Delphi and Java threads on Android: CallInUIThread has been deprecated. All code is now running in the Java UI Thread, removing the need for thread synchronization

Improvements for Firebird


  • New Direct property to add support for the Direct I/O backup feature.

Improvements for MySQL

  • Support for MySQL v 5.7.
  • Support for MariaDB v 5.5 or later. Use FireDAC's MySQL node to connect to MariaDB.
  • Compatibilty with the recent MySQL versions 5.6.x and 5.7.x.

Database improvements


  • VCL TDBImage direct support for JPEG and PNG graphic formats.
  • Support for display options for BlobFields.
  • Direct GUID access for TField classes.

RTL


  • HTTP Client
  • HTTP Client Library provides support for 64-bit Linux.
  • Improved async support in HTTP client
  • RTL support for 64-bit Linux
  • RAD Studio 10.2 Tokyo provides Linux file system support using standard system functions, streams, and the IOUtils unit. It also provides Standard RTL Path Functions support for 64-bit Linux.

Improved C++ packages for mobile

RAD Studio 10.2 Tokyo links C++ packages for iOS and Android statically. Previous versions of RAD Studio generated a file with the .so extension for C++ packages, but were not actually dynamic libraries. RAD Studio 10.2 Tokyo generates C++ packages with the correct file extension (.a). If you statically link against a .so package, you may need to change to link against the new filename.

RAD Server Multi-Tenancy Support

With Multi-Tenancy support, a single RAD Server instance with a single RAD Server database connection can support multiple isolated tenants. Each tenant has a unique set of RAD Server resources including Users, Groups, Installations, Edge Modules, and other data. All tenants have custom resources that are installed in the EMS Server. Also, as an administrator you can create new tenants, edit existing ones, add, edit, or delete details of your tenants, specify if the tenant is active, and delete the tenants that you do not need.

iOS 10 Simulator, device, and macOS

Full support for iOS 10, including iOS 10 32-bit and 64-bit debugging on device, Simulator support (Delphi only) and macOS Sierra support.

The news are not only these, for the complete list of all news of this release go here.

Thursday, March 2, 2017

Intercept KeyEvent on Android with Delphi

Some days ago, I had the needed to intercept the KeyDown Event on Android. In particullary the App have to respond to FormKeyDown Event. After some work I found out that there is an opened issue about this topic (https://quality.embarcadero.com/browse/RSP-10111 - vote it if you need its resolution). So I set to work to find a solution/workaround to solve my need. I studied Android SDK and Delphi internal mechanism and I found out a way to resolve it:
  • By adding a JFMXTextListener to JFMXTextEditorProxy
JFMXTextEditorProxy is an object provided by the JFMXNativeActivity (The activity for all your Android application in Delphi) and provides the method addTextListener to register a JFMXTextListener.
JFMXTextListener is an interface that supply 3 methods to manage text event:

  1.    procedure onComposingText(beginPosition: Integer; endPosition: Integer); cdecl;
  2.    procedure onSkipKeyEvent(event: JKeyEvent); cdecl;
  3.    procedure onTextUpdated(text: JCharSequence; position: Integer); cdecl;
I created a new class TCustomAndroidTextListener that implements JFMXTextListener so I can intercept the KeyEvent in these methods:

TCustomAndroidTextListener = class(TJavaLocal, JFMXTextListener)
  private
    FForm: TCommonCustomForm;
    FLastStr: string;
  protected
    function TryAsKey(const aChar: Char; var Key: Word): Boolean;
  public
    constructor Create(aForm: TCommonCustomForm);
    procedure onComposingText(beginPosition: Integer;
      endPosition: Integer); cdecl;
    procedure onSkipKeyEvent(event: JKeyEvent); cdecl;
    procedure onTextUpdated(text: JCharSequence; position: Integer); cdecl;
  end;

Now I had to add my TextListener, TCustomAndroidTextListener, to JFMXTextEditorProxy so that implemented method can be invoked when the characters are typed:

procedure RegisterTextListener(const aForm: TCommonCustomForm);
var
  FFMXTxp: JFMXTextEditorProxy;
begin
  if Assigned(FTextListener) then
    exit;
  FTextListener := TCustomAndroidTextListener.Create(aForm);
  FFMXTxp := FMX.Platform.Android.MainActivity.getTextEditorProxy;
  // the code below should be equivalent to INPUT_ALPHABET
  // FFMXTxp.setInputType(TJInputType.JavaClass.TYPE_CLASS_TEXT or
  // TJInputType.JavaClass.TYPE_TEXT_VARIATION_VISIBLE_PASSWORD or
  // TJInputType.JavaClass.TYPE_TEXT_FLAG_NO_SUGGESTIONS);
  FFMXTxp.setInputType(TJFMXTextEditorProxy.JavaClass.INPUT_ALPHABET);
  FFMXTxp.addTextListener(FTextListener);
end;

I created a new sample, AndroidKeyEvent, and added it to my demos repository.
In the sample, if you look the code in onTextUpdated method you can notice a solution to understand what the user is typing and propagate keydown event on the form object passed in constructor. This solution is not complete to 100% because is very hard to figure out a way to understand what user is typing if autocomplete mode is on keyboard. It seems to work fine if autocomplete is off, this is why is set the input type to TJFMXTextEditorProxy.JavaClass.INPUT_ALPHABET.
In the coming days I will continue to work on the issue to achieve a better and complete solution. In the meantime I wanted to share the code with you so if you want to contribute you can do it.

Sunday, February 19, 2017

How-To implement 2 finger pan gesture in Delphi Firemonkey

In Firemonkey, as you know, there is a great support for gestures: standard and interactive. The most important interactive gestures as Zoom, Pan, Rotate, DoubleTap (with an amazing description in dockwiki ), etc... are provided by the framework. See here for a full documentation. In a recent project I had the need to implement 2 finger pan gesture, that is not present in the provided gestures. But Firemonkey is a very great framework, and you can implement an event handler to manage custom actions when OnTouch occurs to specify what happens when a user touches the form using a finger or a similar device (not a mouse). So I wrote a little snippet of code that simulate the 2 finger pan gesture, I created a new demo and moved it into my Delphi Demos repository on Github.
I tried it on Android and works fine and very smoothly. It should works fine on all Firemonkey supported platforms: Windows, Android, iOS and OSX.

Wednesday, September 28, 2016

ITDevCon 2016 - Next Week

Hi all,
next week there will be ITDevCon2016 and I'm looking forward to it every time I read the agenda!


Here some info that I hope you appreciate as much as I did:
  • Speakers
    • 15 speakers from all over the world (from Brazil to Slovenia, from Germany to Italy)
    • Almost all the speakers are Embarcadero MVP
  • Topics
    • Last Delphi features
    • Spring4D
    • DelphiMVC framework
    • IoT
    • Delphi and Arduino Integration
    • Firebird 3.x
    • MongoDB
    • Redis
    • Web development with Delphi and most famous web framework (Angular, React)
    • Mobile development
    • Patterns and best practices (REST - Unit Testing - EDA )

There are all prerequisites to be a great conference! 
You cannot miss it !!

Saturday, June 18, 2016

Simple chat messaging system with Delphi and Firebase

Hi all,
some time ago I posted about my open source project: Firebase4Delphi. Well, Firebase was acquired by Google and in Google I/O 2016 was showed very interesting news and new features (more info here ). My project provide a REST facade to consume FIREBASE RealTime Database API.
The Firebase Realtime Database is a cloud-hosted database. Data is stored as JSON and synchronized in realtime to every connected client. When you build cross-platform apps with our iOS, Android, and JavaScript SDKs, all of your clients share one Realtime Database instance and automatically receive updates with the newest data. - Firebase Realtime Database Documentation
In my project there is a sample application about a Chat messaging system. If you enjoy Firebase program (https://console.firebase.google.com/), you are able to create your first Firebase project! See the online documentation to undestand how Firebase works.
Once you create your application you can start to use the Chat Messaging sample, it's very easy if you follow these steps:
  1. Create a clone of Firebase4Delphi project (or download it)
  2. Open Firebase4DelphiChatDemo.dproj
  3. Deploy the app on your favorite Target Platoform (Windows, Mac, Android, iOS)
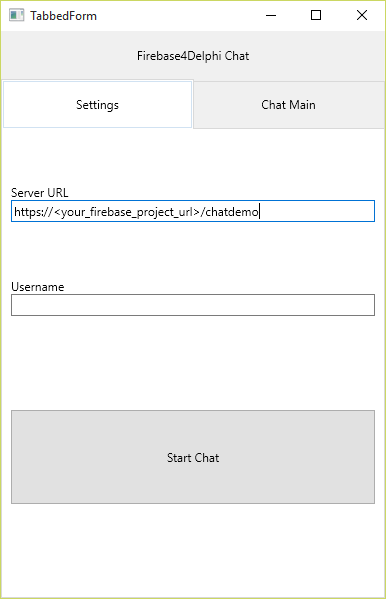
  4. Once application started, put in the settings tab (Fig 1) the URL provided by Firebase Realtime Database related to your project (Fig 2) , adding the demo name "chatdemo" as REST parameter
  5. Choose a username
  6. Click Start Chat button
Fig 1:

Fig 2:


Saturday, January 2, 2016

Using LocationSensor on Android Service in Delphi Seattle

Hi all,
this is a very great news!
Me and my CEO (Daniele Tetibit Time Professionals) have figured out how to implement and use the LocationSensor on Android Service.
Some months ago, I found out that there is a malfunction in Delphi: If you put LocationSensor component on Android Service DM, the service crashes. So I opened an issue on the quality portal, which was recognized and classified with majority prior.
However we need to retrieve the Device position from a background Service not by a foreground Activity.
We have investigated into the code and found this mistake in System.Android.Sensors unit:
  • For the majority of the code, it is assumed that the context of Application is an Activity 
Here is the code:

FActivity := TJNativeActivity.Wrap(System.DelphiActivity)^.clazz);

The code above works fine if you are in Android Activity context, like our case. If you are in a service context though, this doesn't work (the DelphiActivity pointer is null, rightly). If there is not necessity to have a reference to the Activty, but only the context of Application, this code is to be preferred:

LContext := TJContextWrapper.Wrap(System.JavaContext);

Below you can find the System.Sensors and System.Android.Sensors units (opportunely renamed System.SensorsDD and System.Android.SensorsDD), with the fixes explained earlier (the code contains comments for any changes):
System.SensorsDD:
// about line 748
implementation
uses
  System.Variants, System.Math, System.Character,
{$IFDEF ANDROID}
  // -- patch dd
  // include the modified System.Android.SensorsDD
  System.Android.SensorsDD;
{$ENDIF ANDROID}

System.Android.SensorsDD:
...
//about line 12
uses
  // -- patch dd
  // use the modified System.SensorsDD
  System.SensorsDD;
...
// about line 70
class constructor TPermission.Create;
var
  PackageInfo: JPackageInfo;
  PackageManager: JPackageManager;
  Activity: JActivity;
  LContext: JContext;
begin
  // -- patch dd
  // Activity := TJNativeActivity.Wrap
  // (PANativeActivity(System.DelphiActivity)^.clazz)
  LContext := TJContextWrapper.Wrap(System.JavaContext);
  PackageManager := LContext.getPackageManager();
  PackageInfo := PackageManager.getPackageInfo
    (LContext.getApplicationContext.getPackageName,
    TJPackageManager.JavaClass.GET_PERMISSIONS);
  FPermissions := PackageInfo.requestedPermissions;
end;
...
// about line 100
type
  TAndroidGeocoder = class(TGeocoder)
  private type
    TGeocoderRunnable = class(TJavaLocal, JRunnable)
    private
      FCoord: TLocationCoord2D;
      FLGeocoder: JGeocoder;
    public
      constructor Create(ACoord: TLocationCoord2D; AGeocoder: JGeocoder);
      procedure run; cdecl;
    end;
  private
  class var
    FGeocoder: JGeocoder;
    // FActivity: JActivity; // -- patch dd
    FActivity: JContextWrapper; // -- patch dd
...
// about line 130
  TUIAndroidLocationSensor = class(TCustomLocationSensor)
  private
    FPermitted: Boolean;
    // FActivity: JNativeActivity; // -- patch dd
    FActivity: JContext; // -- patch dd
    FLastValue: JLocation;
    FLocationManager: JLocationManager;
    FAccuracy: TLocationAccuracy;
    FDistance: TLocationDistance;
...
// about line 1600
constructor TUIAndroidLocationSensor.Create(AManager: TSensorManager);
var
  LocationService: JObject;
begin
  inherited;
  // FActivity := TJNativeActivity.Wrap
  // (PANativeActivity(System.DelphiActivity)^.clazz); // -- patch dd
  FActivity := TJContext.Wrap(System.JavaContext); // -- patch dd
  LocationService := FActivity.getSystemService
    (TJContext.JavaClass.LOCATION_SERVICE);
  if Assigned(LocationService) then
    FLocationManager := TJLocationManager.Wrap((LocationService as ILocalObject)
      .GetObjectID);
end;
...
// about line 1630
  function RunIfPossible(var ARunnable: TLocationRunnable;
    var AListener: TLocationListener; AProviderName: JString): Boolean;
  var
    Provider: JLocationProvider;
    LHandler: JHandler;
  begin
    Result := False;
    if FLocationManager.isProviderEnabled(AProviderName) then
    begin
      if AListener = nil then
        AListener := TLocationListener.Create(Self);
      Provider := FLocationManager.getProvider(AProviderName);
      if Provider <> nil then
      begin
        ARunnable := TLocationRunnable.Create(FLocationManager, AListener,
          AProviderName);
        // FActivity.runOnUiThread(ARunnable); // --patch dd
        // -- patch dd
        // You can use post method of Handler instead runOnUiThread in this case.
        // more info here: http://developer.android.com/guide/topics/fundamentals/processes-and-threads.html
        LHandler := TJHandler.JavaClass.init;
        LHandler.post(ARunnable);
        Result := True;
      end;
    end;
  end;
...
// about line 1830
class constructor TAndroidGeocoder.Create;
begin
  // -- patch dd
  // FActivity := TJNativeActivity.Wrap
  // (PANativeActivity(System.DelphiActivity)^.clazz);
  FActivity := TJContextWrapper.Wrap(System.JavaContext);
  FGeocoder := TJGeocoder.JavaClass.init(FActivity);
end;


Now you are able to using LocationSensor in this way:
uses
  System.SensorsDD, System.Android.SensorsDD
...
...
var
  FSensors: TSensorArray;
  Sensor: TCustomSensor;
begin
  TSensorManager.Current.Active := true;
  FSensors := TSensorManager.Current.GetSensorsByCategory(TSensorCategory.Location);

  FSensor := nil;
  for Sensor in FSensors do
  begin
    if TCustomLocationSensor(Sensor).SensorType = TLocationSensorType.GPS then
    begin
      FSensor := TCustomLocationSensor(Sensor);
      Break;
    end;
  end;

  if not Assigned(FSensor) then
    Exit; { no location sensor is available }

  { start the sensor if it is not started }
  if not FSensor.Started then
    FSensor.Start;

You can find a complete demo here. Hopefully this solution will be helpful to you the way it was for us.

P.S.
Stay tuned as because of this fix a very interesting application/project is about to see the light of day :)

Monday, April 20, 2015

How-To use AdMob Interstitial Ads with Delphi XE7-XE8

Hi guys,
as you know by using the Delphi Android JNI you can access to Native features provided by Android SDK. The RAD Studio installation includes also Google Mobile ADS library (Androidapi.JNI.AdMob unit), as built-in java library for Android.
So by using this unit we can use the new Interstitials Ads provided by AdMob.
First of all rember to set to true the AdMob Service ( Project -> Entitlement List -> AdMob Service )


Let's start with the code.
Create an instance of TJInterstitialAd, wich is present in Androidapi.JNI.AdMob.
  
    FInterstitial := TJInterstitialAd.JavaClass.init(MainActivity);
    FInterstitial.setAdUnitId(StringToJString('Your-Publisher-ID'));

For example you can put the previous code in the FormCreate event. Then you have to use this code to display an Interstitial Ad (on button-click event in my demo):

var
  LADRequestBuilder: JAdRequest_Builder;
  LadRequest: JAdRequest;
begin
  LADRequestBuilder := TJAdRequest_Builder.Create;
  LADRequestBuilder.addTestDevice(MainActivity.getDeviceID);
  LadRequest := LADRequestBuilder.build();
  LAdViewListener := TMyAdViewListener.Create(FInterStitial);
  CallInUIThread(
    procedure
    begin
      FInterStitial.setAdListener(TJAdListenerAdapter.JavaClass.init
        (LAdViewListener));
      FInterStitial.loadAd(LadRequest);
    end);
end;

I used the TJAdRequest_Builder to create a request and set my device like a test device (see AdMob guidelines).
I also created a custom AdViewListener to intercept the interstitial events:
  • onAdClosed;
  • onAdFailedToLoad(errorCode: Integer);
  • onAdLeftApplication;
  • onAdOpened;
  • onAdLoaded;
TJAdListenerAdapter adapts my Listener class to Interstitial AdListener, this because I created a custom class to support interstitial events and show effectively the Ad when it was loaded.

TMyAdViewListener = class(TJavaLocal, JIAdListener)
  private
    FAD: JInterstitialAd;
  public
    constructor Create(AAD: JInterstitialAd);
    procedure onAdClosed; cdecl;
    procedure onAdFailedToLoad(errorCode: Integer); cdecl;
    procedure onAdLeftApplication; cdecl;
    procedure onAdOpened; cdecl;
    procedure onAdLoaded; cdecl;
  end;

procedure TMyAdViewListener.onAdLoaded;
begin
  FAD.show;
end;

Here the screenshot of interstitial on my phone:


This code should works also on AppMethod.
You can find the demo in my GitHub repository.

Thursday, October 9, 2014

Automate Save State Feature in Firemonkey

Hi!
One of the many exciting new features of Delphi XE7 is the Save State in Firemonkey.
The FireMonkey Save State feature allows you to save data describing the state of the application before it closes. The Save State data can be used to recover the state after the application is restarted.
This is a very cool feature but the way in which you save and restore the data is not so refined (for more info see this http://docwiki.embarcadero.com/RADStudio/XE7/en/FireMonkey_Save_State ).
What happen if I need to save 10,15 or more components? I need to specify the save and the restore for each one.
So I decided to write a class helper to automate this process!
Using JSON serialization all the components of type TFMXObject are saved. In particular is stored the Data property.

You can find the demo in my github repository .

This is a snippet of the demo

uses SaveStateHelper;

procedure TForm1.FormCreate(Sender: TObject);
begin
  LoadFormState;
end;

procedure TForm1.FormSaveState(Sender: TObject);
begin
  SaveFormState;
end;

I hope you enjoy it!!

Tuesday, June 3, 2014

Access Marvel Developer API with Delphi XE6


Marvel has recent made available The Marvel Comics API, that allows developers everywhere to access information about Marvel Universe. "The Marvel Comics API is a RESTful service which provides methods for accessing specific resources at canonical URLs and for searching and filtering sets of resources by various criteria. All representations are encoded as JSON objects".


So my idea is to access these API with the Delphi REST Client Library and create an awesome app.
Let's start!
At First we need to register to the developers program, once registered we will be given 2 keys one public and the other private that will be used to call the Marvel API. For more information about the service, resources, authentication and so on I refer you to the official Pages: General Info - Getting Started - Interactive API tester.
You can access six resource types using the API:

  • Comics
  • Comic Series
  • Comic Stories
  • Comic events and crossovers
  • Creators
  • Characters

In this first demo app I get information only about characters of Marvel Universe.


I created an HeaderFooter Mobile Application by the wizard, modified the text of prebuilt label for the Title ("Marvel Character"), added a TLabel for the name of the Character, a TImage that is the representative image for the character and finally I insert the mainly 3 components of the REST Client Library: RESTClient, RESTRequest and RESTResponse.
The Marvel Comics API’s base endpoint is http://gateway.marvel.com/v1/public so I put this URL in the BaseURL property of the RESTClient.


The RESTRequest represent the resource in the REST pattern and in this case represent the character. I defined the Resource property in this way: characters?limit=1&offset={OFFSET}&ts={TS}&apikey={APIKEY}&hash={HASH}.
There are 3 parameters:
  • limit - that represent the number of the result, in this case 1 result for time because we can see 1 character at time on the form
  • offset - that indicate the distance from the first character
  • ts - a timestamp (or other long string which can change on a request-by-request basis)
  •  apikey - your public key
  • hash - a md5 digest of the ts parameter, your private key and your public key (e.g. md5(ts+privateKey+publicKey)
This is the snippet code of request:

procedure THeaderFooterForm.ExecuteRequest;
var
  TS: string;
  imd5: TIdHashMessageDigest;
  HASHStr: string;
begin
  // StartWait show a progress dialog until the request is finished
  StartWait;
  TS := IntToStr(DateTimeToUnix(Now));
  RESTRequest1.Params.ParameterByName('OFFSET').Value := FOffSet.ToString;
  RESTRequest1.Params.ParameterByName('TS').Value := TS;
  RESTRequest1.Params.ParameterByName('APIKEY').Value := PUBLIC_KEY;
  imd5 := TIdHashMessageDigest5.Create;
  try
    HASHStr := TS + PRIVATE_KEY + PUBLIC_KEY;
    RESTRequest1.Params.ParameterByName('HASH').Value :=
      imd5.HashStringAsHex(HASHStr).ToLower;
    RESTRequest1.ExecuteAsync(OnAfterRequest);
  finally
    imd5.Free;
  end;
end;

Once the call give a result will need to parse the JSON response to take the name of the character and its image, obviously respecting the JSON structure described in the official documentation:

procedure THeaderFooterForm.OnAfterRequest;
var
  RetObject: TJSONObject;
  RetData: TJSONObject;
  MResult: TJSONObject;
  Loader: TImageLoaderThread;
  Thumbnail: TJSONObject;
begin
  try
    RetObject := TJSONObject.ParseJSONValue(RESTResponse1.Content)
      as TJSONObject;
    RetData := RetObject.GetValue('data') as TJSONObject;
    MResult := (RetData.GetValue('results') as TJSONArray).Get(0)
      as TJSONObject;
    Thumbnail := MResult.GetValue('thumbnail') as TJSONObject;
    Text1.Text := MResult.GetValue('name').Value;
    // TImageLoaderThread is a custom class to retrieve the image in a background thread
    // and 2 anonymous methods to notify when thread finish download image and when bitmap is ready  
    Loader := TImageLoaderThread.Create(true, nil, OnBitmapLoaded);
    Loader.ImgURL := Thumbnail.GetValue('path').Value + '.' +
      Thumbnail.GetValue('extension').Value;
    Loader.Start;
  finally
    StopWait;
  end;
end;

The image is provided by another URL so I have to make another request for the image.
Both the request (info character + image) are completed by background threads so it doesn't block the GUI.
Here some screeenshot about final app


The app run on Android device but the code work on Android, iOS, Windows and Mac.
In the next post I will improve the app creating a master-detail structure that allowing to search character by other criteria!
The code was loaded on my github repository.

Friday, April 11, 2014

My First Appmethod App


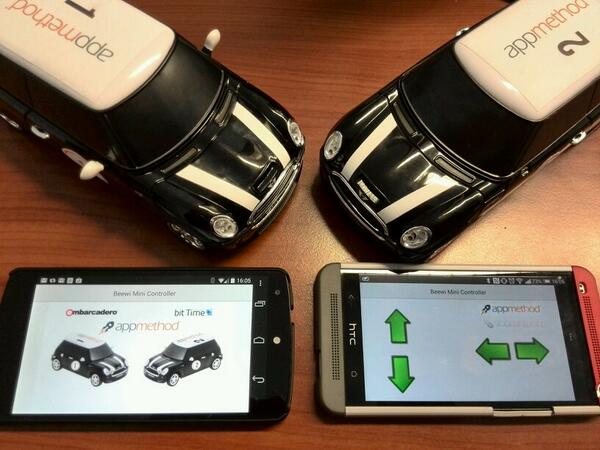
In the "bit Time Lab" me and my colleague Daniele Teti have developed an app to control a car via bluetooth with Appmethod, for Android and iOS (released soon) with the same codebase.

The main topics covered by the team are the multitouch UI and the bluetooth hardware interface using a true native app (no VMs, no scripting, no compromises). Below the picture of the app and the cars used.


Collegamento permanente dell'immagine integrata


The most interesting note was the time: we spent 7/8 hours to develop and build the entire system!
This project will be shown at the Rome Codemotion.
Here the video presentation of this project by bit Time Lab

Tuesday, March 11, 2014

Gideros Mobile - A game development tool

Gideros is a set of software packages created and managed by a company named  Gideros Mobile, it provides developers with the ability to create 2D games for multiple platforms by reusing the same code.

At italian DROIDCON in Turin, I held a speech about the Gideros Mobile framework (the slides will be available shortly).

We appreciate this tool so much that in bit Time Software we decided to make a game using Gideros: Math Brain. It's free and available for Android and iOS devices.


To start developing with Gideros I suggest the online tutorials and the book Gideros Mobile Game Development. Here you can find some considerations about the book written by me and my colleague Daniele Teti.

I hope to write soon new post about this tool.

Tuesday, January 29, 2013

How-To: Send Facebook App Request

Hi developer,
the problem in which I came across today was: how to link my Android app using Facebook SDK for Android?
The premise is that your Android app must appear in the App Center of Facebook and must be integrated with Facebook by the appropriate SDK.

The crucial point that is not mentioned by facebook tutorial is that the method to be called is "apprequests".

This is the code:
Bundle parameters = new Bundle();
params.putString("method", "apprequests");
WebDialog.RequestsDialogBuilder req = new WebDialog.RequestsDialogBuilder(this, mSession, parameters);
req.setMessage("Your message that compare in the request");
req.setTitle("The title of the web dialog");
req.build().show();

Also not specifying your friends (like the example code above) user will see a Multi Friend Selector and will be able to select a maximum of 50 recipients.

Tuesday, January 15, 2013

Custom Font for View

Hi developers,
today I want to show you how to set a custom font to a View either by code or using an XML file.
The first way is very simple: just copy the font file into "assets/fonts/"  folder and  load it using Typeface classcalling createFromAssets method.


TextView txtView1 = (TextView) findViewById(R.id.textView1);
Typeface externalFont = Typeface.createFromAsset(getAssets(), "fonts/CONSOLA.TTF");
txtView1.setTypeface(externalFont);

Very simple! The hardest way is set custom Font using an XML file, especially by using styles!!
Yes it is possible! unlike what you read in various forums...
Just extremize the concept of custom view.
So the first thing to do is create a CustomView (in this case is a TextView but the concept is valid for all View), within a method to set the "Custom Font" that we call in the constructor of View:

 public CustomFontTextView(Context context, AttributeSet attrs) {
        super(context, attrs);
        setCustomFont(context, attrs);
    }

    public CustomFontTextView(Context context, AttributeSet attrs, int defStyle) {
        super(context, attrs, defStyle);
        setCustomFont(context, attrs);
    }

    private void setCustomFont(Context ctx, AttributeSet attrs) {
        TypedArray a = ctx.obtainStyledAttributes(attrs, R.styleable.CustomFontTxtView);
        String customFont = a.getString(R.styleable.CustomFontTxtView_customFont);
        setCustomFont(ctx, customFont);
        a.recycle();
    }

    public boolean setCustomFont(Context ctx, String asset) {
        Typeface tf = null;
        try {
        tf = Typeface.createFromAsset(ctx.getAssets(), asset);  
        } catch (Exception e) {
            Log.e(TAG, "Error to get typeface: "+e.getMessage());
            return false;
        }
        setTypeface(tf);  
        return true;
    }

to be able to change from xml we need to create our style resources in this way:


And now we can set the font from layout XML file!!!:


Here you can download the complete example.


Friday, January 4, 2013

Sending SMS messages

Hi all,
in Android there are two ways to send SMS messages.
The first is to delegate the send action to SMS application by intent:
 
Intent sendIntent = new Intent(Intent.ACTION_VIEW);
sendIntent.putExtra("sms_body", "Content of the SMS goes here..."); 
sendIntent.setType("vnd.android-dir/mms-sms");
startActivity(sendIntent);

The second way is to use the SmsManager (added in API level 4):

//---sends an SMS message to another device---
    private void sendSMS(String phoneNumber, String message)
    {        
        PendingIntent pi = PendingIntent.getActivity(this, 0,
            new Intent(this, SMS.class), 0);                
        SmsManager sms = SmsManager.getDefault();
        sms.sendTextMessage(phoneNumber, null, message, pi, null);        
    }

To use the second method you need to add the permission to the manifest, because you send the message directly


Wednesday, November 28, 2012

Android & Arduino: LEDS control

Hi all,
last week I have bought an OTG cable so I can interface my Android devices (Galaxy Nexus, Xoom) with the Arduino board.
My example is to turn on and off the LEDs located on Arduino by an Android device!
What we need:

  1. Arduino Uno board
  2. Android devices (version 3.0 or higher)
  3. Micro USB OTG to USB Adapter (thanks to Amazon!)
  4. Arduino Uno Communicator (avaiable on playstore)
  5. 3x leds
  6. 3x resistors
  7. 4x cable connection strips
  8. Breadboard
So make the connection as shown in the picture:


Now we have to load this code in Arduino:
/*
 * Arduino LEDs Control
 * 
 */

int val = 0;       // variable to store the data from the serial port
int ledPin1 = 2;   // LED connected to digital pin 2
int ledPin2 = 3;   // LED connected to digital pin 3
int ledPin3 = 4;   // LED connected to digital pin 4
int ledPin4 = 5;   // LED connected to digital pin 5
int ledPin5 = 6;   // LED connected to digital pin 6

void setup() {

  pinMode(ledPin1,OUTPUT);    // declare the LED's pin as output
  pinMode(ledPin2,OUTPUT);    // declare the LED's pin as output
  pinMode(ledPin3,OUTPUT);    // declare the LED's pin as output
  pinMode(ledPin4,OUTPUT);    // declare the LED's pin as output
  pinMode(ledPin5,OUTPUT);    // declare the LED's pin as output


  Serial.begin(9600);        // connect to the serial port
}

void loop () {
  val = Serial.read();      // read the serial port

  
  if (val !=-1){

    if (val=='1'){
      digitalWrite(ledPin1,HIGH);
    }
    
    else if (val=='A'){
      digitalWrite(ledPin1,LOW);
      }
    
    if (val=='2'){
      digitalWrite(ledPin2,HIGH);
    }

    else if (val=='B'){
      digitalWrite(ledPin2,LOW);
      }

    if (val=='3'){
      digitalWrite(ledPin3,HIGH);
    }

    else if (val=='C'){
      digitalWrite(ledPin3,LOW);
      }

    if (val=='4'){
      digitalWrite(ledPin4,HIGH);
    }

    else if (val=='D'){
      digitalWrite(ledPin4,LOW);
      }

    if (val=='5'){
      digitalWrite(ledPin5,HIGH);
    }

    else if (val=='E'){
      digitalWrite(ledPin5,LOW);
      }
   
    //Serial.println();
  }
}

This code is really easy to understand: if you get the string "1" turns ON the LED on pin 2, if you get the string "2" turns ON the LED on pin 3 ... and so on. If you get the string "A" turns OFF the LED on pin 2, if you get the string "B" turns OFF the LED on pin 3... and so on.

And this is the code for the Android app:

package com.spinettaro.arduinoledscontrol;

import android.app.Activity;
import android.content.Intent;
import android.os.Bundle;
import android.view.Menu;
import android.view.View;
import android.widget.CompoundButton;
import android.widget.CompoundButton.OnCheckedChangeListener;
import android.widget.Switch;
import android.widget.Toast;

public class MainActivity extends Activity implements OnCheckedChangeListener {

 // set in an array the id of every switch
 private final static Integer[] ids = { R.id.switch1, R.id.switch2,
   R.id.switch3, R.id.switch4, R.id.switch5 };

 @Override
 protected void onCreate(Bundle savedInstanceState) {
  super.onCreate(savedInstanceState);
  setContentView(R.layout.activity_main);
  registerLedChangeListener(ids);
 }

 //register all onCheckedChangeListener for all Switch
 private void registerLedChangeListener(Integer... ids) {
  for (int i = 0; i < ids.length; i++) {
   Integer id = ids[i];
   Switch led = (Switch) findViewById(id);
   led.setOnCheckedChangeListener(this);
  }
 }

 public void loop(View v) {
  try {
   // gone
   sendString("1");
   Thread.sleep(50);
   sendString("A");
   Thread.sleep(50);
   sendString("2");
   Thread.sleep(50);
   sendString("B");
   Thread.sleep(50);
   sendString("3");
   Thread.sleep(50);
   sendString("C");
   Thread.sleep(50);

   // return
   sendString("3");
   Thread.sleep(50);
   sendString("C");
   Thread.sleep(50);
   sendString("2");
   Thread.sleep(50);
   sendString("B");
   Thread.sleep(50);
   sendString("1");
   Thread.sleep(50);
   sendString("A");
   Thread.sleep(50);
  } catch (Exception e) {
   Toast.makeText(this, e.getMessage(), Toast.LENGTH_SHORT).show();
  }
 }

 @Override
 public boolean onCreateOptionsMenu(Menu menu) {
  // Inflate the menu; this adds items to the action bar if it is present.
  getMenuInflater().inflate(R.menu.activity_main, menu);
  return true;
 }

 @Override
 public void onCheckedChanged(CompoundButton buttonView, boolean isChecked) {
  switch (buttonView.getId()) {
  case R.id.switch1:
   if (isChecked)
    sendString("1");
   else
    sendString("A");
   return;
  case R.id.switch2:
   if (isChecked)
    sendString("2");
   else
    sendString("B");
   break;
  case R.id.switch3:
   if (isChecked)
    sendString("3");
   else
    sendString("C");
   break;
  default:
   break;
  }
 }

 private void sendString(String toSend) {
  Intent i = new Intent("primavera.arduino.intent.action.SEND_DATA");
  i.putExtra("primavera.arduino.intent.extra.DATA", toSend.getBytes());
  sendBroadcast(i);
 }

}

Here there's the WOW effect! Because thanks to the IPC Android system I can communicate with Arduino through the use of broadcast intent, because the part of interfacing with the ADK was handled by Arduino Uno Communicator. To send data to Arduino from your application it's only necessary broadcasting an intent with action "primavera.arduino.intent.action.SEND_DATA". Add the data to be sent as byte array extra "primavera.arduino.intent.extra.DATA".


And this is the video of the demo:


Here you can find the full source code for Android application.

Tuesday, October 30, 2012

DroidDevCon - An Android Conference - EN


Hi all,
As you learned from my previous post the day 10/24/2012 took place in Verona, Italy, the first Italian conference on Android development: DroidDevCon.


So I'm here to write my thoughts :) .
The conference was very successful, both in terms of organization and content.
There have been interesting talks as "Android for embedded devices" that talked about the customization of Android on dedicated devices (which unfortunately I could not attend). I look forward to the availability of the video to cover it with care; yes, because all sessions were shooting!
So if anyone is interested to conference or video I think will soon be available at these locations DroidDevCon - bit Time TV.
I could not attend some sessions because I was busy with my presentations: "Developing games with AndEngine" & "In-app billing."
The first regards to how develop games with AndEngine: a game-engine for Android, the second how works how you can implement the in-app billing service provided by Google Play.
I wanted to take this opportunity to show a slide (introduced in the second presentation) very successful, friendly and gave me a great satisfaction in demonstrating:


This image has been used to explain the differences between freemium-model and payment-model and what is the right way to choose without falling into the "trap."
To all those who don't know what it means I place also the video of the famous saga:


I conclude by thanking all for the beautiful experience! It was a day where I could compare with other developers, learn new things and explore the familiar concepts! But above all it was a day on which I have drawn ideas and inspiration! So in the next few days you will see other posts :).
I hope DroidDevCon be repeated again next year, because it was a conference with the WOW effect!

Sunday, October 28, 2012

DroidDevCon - An Android Conference - ITA

Hi all,
come avete appreso da un mio post precedente il giorno 24/10/2012 si ĆØ svolta a Verona la prima conferenza italiana sullo sviluppo Android: DroidDevCon.


Quindi sono qui per scrivere le mie riflessioni :) .
La conferenza ĆØ stata veramente ben riuscita, sia dal punto di vista dell'organizzazione che dal punto di vista dei contenuti.
Ci sono stati talk interessantissimi come "Android per dispositivi embedded" che parlava della customizzazione di Android su dispositivi dedicati (al quale purtroppo non ho potuto assistere). Non vedo l'ora che siano disponibili i video per riguardarlo con attenzione; giĆ  perchĆ© tutte le sessioni sono state riprese! Quindi se qualcuno ĆØ interessato alla conferenza o ai video penso che tra poco saranno disponibili a questi indirizzi DroidDevCon - bit Time TV. Non ho potuto assistere ad alcune sessioni perchĆ© ero impegnato con le mie presentazioni: "Sviluppare videogiochi con AndEngine" & "In-app billing". Il primo riguarda come sviluppare giochi con AndEngine: un game-engine per Android; il secondo di come funziona e come si implementa il servizio di in-app billing messo a disposizione del Google Play.
Volevo cogliere l'occasione anche per mostrarvi una slide introdotta nella seconda presentazione molto riuscita, simpatica e che mi ha dato una bella soddisfazione nel mostrarla:


ĆØ stata utilizzata per spiegare le differenze tra modello free e modello a pagamento e quale ĆØ la strada giusta da scegliere senza cadere nella "trappola".
A tutti coloro che non sanno cosa significa posto anche il video della famosissima saga:


Volevo concludere ringraziando tutti per la bella esperienza passata! è stata una giornata intensa dove mi sono potuto confrontare con altri sviluppatori, imparare cose nuove ed approfondire i concetti già acquisiti! Ma soprattutto è stata una giornata dalla quale ho ricavato idee e spunti! Quindi nei prossimi giorni vedrete altri post :). Spero che DroidDevCon si ripeta anche il prossimo anno, perché è stata una conferenza con l'effetto WOW!

Wednesday, October 10, 2012

DroidDevCon - An Android conference

DROIDDevCon is the first conference in italy completly focused on Android OS development.


This conference is an important event for all developers or software Engineers who want beeing updated on Mobile Development and getting new knowledge on Android development.
The conference web site is http://www.droiddevcon.it.

I think it will be a really interesting event! Do not miss!!

Tuesday, April 17, 2012

Intercept SMS with Broadcast Receiver

Hi developers,

in Android Broadcast Receivers are used to listen for broadcast Intents. A Broadcast Receiver needs to be registered, either in code or within the application manifest. (in this case is registered in the manifest)
When registering a Broadcast Receiver you must use an Intent Filter to specify which Intents it is listening for.

We use BroadcastReceiver to intercept SMS.
See the code below

import android.content.BroadcastReceiver;
import android.content.Context;
import android.content.Intent;
import android.os.Bundle;
import android.telephony.SmsMessage;
import android.widget.Toast;

public class SMSBroadcastReceiver extends BroadcastReceiver{
        @Override
 public void onReceive(Context context, Intent intent) {
  Bundle bundle = intent.getExtras();
  SmsMessage[] msgs = null;
  StringBuilder str = new StringBuilder();
  if (bundle != null) {
   // --- retrieve the received SMS here ---
   Object[] pdus = (Object[]) bundle.get("pdus");
   msgs = new SmsMessage[pdus.length];
   for (int i = 0; i < msgs.length; i++) {
    msgs[i] = SmsMessage.createFromPdu((byte[]) pdus[i]);
    str.append("SMS from " + msgs[i].getOriginatingAddress());
    str.append(" :");
    str.append(msgs[i].getMessageBody().toString());
    str.append("\n");
   }
   // ...we show sms here...
   Toast.makeText(context, str.toString(), Toast.LENGTH_SHORT).show();
  }
 }
}

As you can see, we extends from BroadcastReceiver and override the method onReceive where we retrieve information about the received SMS.

In the manifest you must define the RECEIVE_SMS uses-permission, register the receiver (our class SMSBroadcastListener) and his intent-filter (SMS_RECEIVED):


They will be started automatically when a matching Intent is broadcast, in practice when received an SMS you will see a Toast with SMS information.

Tuesday, April 3, 2012

Where am I? Finding your location

One of the coolest thing that you can do with your Android device, is find your location!
In Android there are location-based services to get the current location of device. There are two ways to get the physical location:

  • Network Provider
  • GPS Provider
By LocationManager object we can retrieve latitude and longitude of last known location.
Now with these information and using Geocoder we get the addresses in the neighbours. Here's the code snippet:
// max of adresses near you
int max_result = 1;
// you can decide if use a network or gps provider
String provider = LocationManager.NETWORK_PROVIDER;
LocationManager locationManager = (LocationManager) getSystemService(Context.LOCATION_SERVICE);
// get the last know location
Location location = locationManager.getLastKnownLocation(provider);
double latitude = location.getLatitude();
double longitude = location.getLongitude();
List<address> addresses = null;
Geocoder gc = new Geocoder(this, Locale.getDefault());
try {
     addresses = gc.getFromLocation(latitude, longitude, max_result);
} catch (IOException e) {}
// return the string information
Toast.makeText(this, addresses.get(0).toString(), Toast.LENGTH_LONG)
     .show();
This example assumes:

  •  that you have enabled the NETWORK_PROVIDER
  •  so you can add in the manifest file the ACCESS_FINE_LOCATION uses-permission